Friday, November 13, 2020

PetaPixel: Adobe Apps Not Officially Supported on Apple Silicon Running Rosetta 2

As part of its announcement of new Mac computers earlier this week, Apple mentioned that Adobe plans to release versions of its software that are compatible with Apple’s new M1 chip. That’s good news it turns out, since the company isn’t able to officially support emulation via Rosetta 2 on those devices.

Rosetta 2 is an included operating system emulation tool available in macOS Big Sur that runs apps compiled for the Intel chipset on Macs powered by Apple silicon.

On Adobe’s Compatibility page, the company states definitively that while Apple has made it clear many apps will continue to run on Rosetta 2 emulation on the M1 chip – even saying that some apps may even run better than they would on native Intel chips – Adobe Lightroom Classic is not considered compatible with this method.

Caution: Running Adobe apps under Rosetta 2 emulation mode on Apple devices with Apple Silicon M1 processors is not officially supported. Native support is planned.

Even with this warning, Adobe additionally says that there are no known issues specific to running Lightroom Classic 10 under Rosetta 2 emulation on Apple devices with M1 processors running macOS BigSur (version 11). So while it’s a process the company can’t officially support, it’s still likely possible to continue using Lightroom and Photoshop via Rosetta 2 for the time being.

In a comment to PetaPixel after the Apple presentation, Adobe confirmed that native support is coming for Apple M1.

“We’re excited to bring CC apps to Apple Silicon devices, including native support for Lightroom next month and Photoshop in early 2021,” an Adobe representative said. “Regarding Lightroom Classic, the team is working on a native version of Lightroom Classic for Apple Silicon, and it will be released next year. We’re also committed to continuing support for Intel-based Macs.”

No specific timeline for new Adobe apps designed for the M1 chip has been provided.

It should also be noted that Adobe states that legacy versions of Adobe Lightroom are not compatible with macOS Big Sur:

Unsupported versions of Lightroom Classic were not designed or tested to work on macOS Big Sur (version 11). Older versions use 32-bit licensing components and installers and will not be able to be installed, uninstalled, or activated after upgrading to macOS Big Sur. If you have already upgraded to macOS Big Sur, use the Creative Cloud Cleaner Tool to uninstall older versions.

As it stands, current Creative Cloud subscribers are unlikely to run into problems on any of the three new Apple Macs, though the software company is clear they should do so with caution. Adobe was not likely able to fully test all possible scenarios with its software and Apple hardware, and while they cannot currently report any known issues, some may arise.


from PetaPixel https://ift.tt/3eVQYAh
via IFTTT

Dpreview.com: Apple's new ProRAW image format will capture 12-bit Raw DNG files


via Articles: Digital Photography Review (dpreview.com) https://ift.tt/2H576TC

PetaPixel: Apple ProRAW Photos Will Be 12-Bit DNGs with 14-Stops of Dynamic Range

Yesterday, the developer beta for iOS 14.3 – which contains the upcoming ProRAW photo feature – became available. Though the exact date of the consumer beta or final release of the software has yet to be announced, we now know some facts about how ProRAW will work.

In an interview last week with Apple, we already gleaned a lot of information about the advantages of the coming file type. The company created a new imaging pipeline that combines computational photography techniques with the power of RAW files, allowing photographers for the first time to gain access to both features simultaneously. You can read that story here.

What was unknown at the time was how the process of capturing a ProRAW would work, what kind of RAW we would see produced, and what options photographers would have with the file.

We now know that a ProRAW file will be a 12-bit RAW DNG with 14-stops of dynamic range. That file will give you access to the standard options like white balance, tone mapping, exposure, and black point, but Apple will also be providing more information inside the RAW file that includes tone mapping and pigmentation maps for skin and skies.

The file will be written to the DNG, or digital negative, file format. The native Photos app as well as certain third-party apps – like Darkroom – will be able to gain full access to a wealth of digital image data right off the bat. Programs like Adobe Lightroom and Photoshop as well as Capture One will also be able to read the file, but those initial renderings will improve once those companies update their profiles to include the iPhone 12 Pro and Pro Max.

You will be able to enable ProRAW by toggling a switch in the Settings app, after which the Camera app will have a button that can be tapped to turn the feature on and off. If you take a ProRAW photo and view it in the Photos app, you’ll see a “RAW” badge on it just like you already do for an HDR image or Live Photo.

However, what you will be seeing is the rendered photo, not the raw itself. This means the phone essentially is capturing in JPEG and RAW automatically. If you choose to edit the image you’ll then be shown the RAW image which you can save non-destructively.

You can also choose to export the DNG into an editing app on your phone or to your computer for editing in any program that is compatible with DNGs.

Only the iPhone 12 Pro and 12 Pro Max will have access to ProRAW, which leaves the standard iPhone 12 and the 12 Mini out. That said, any camera on either of those models will be able to capture images in ProRAW, including the front-facing camera.

As far as how much to expect from those 14-stops of dynamic range when it comes to real-world photography is yet to be seen. PetaPixel is intending on performing a full review of the new RAW format when it becomes available.


from PetaPixel https://ift.tt/32KYMjw
via IFTTT

PetaPixel: These Are the Highest Resolution Photos of Snowflakes Ever Captured

Photographer Nathan Myhrvold has captured the most detailed images of snowflakes thanks to a custom-built high-resolution cooled camera he made to specifically deal with the numerous challenges of photographing the delicate ice crystals.

As you can probably imagine, there are numerous challenges to overcome if you want to photograph snowflakes. Those challenges were what led Myhrvold to try and do it, as he felt compelled to tackle the subject matter. Only a few millimeters across, snow crystals present a challenge due to their size and fragility.

The images captured were shot on location in Fairbanks, Alaska, and Yellowknife, Northwest Territories, Canada. Some of the best snowflakes Myhrvold found were at temperatures between –15 and –20 degrees Fahrenheit (–26 to –29 Celcius).

Snowflakes both melt and sublimate, causing the sharp features of the crystal structure to degrade over a short period of time. When building his method, Myhrvold had to carefully consider time, temperature, weather conditions, and equipment.

According to his representation Modernist Cuisine, Myhrvold spent about 18 months designing and building a custom snowflake camera so that he could photograph snow crystals with this degree of detail and clarity. Calling it “the highest-resolution snowflake camera in the world,” it uses a Phase One sensor (100MP) adapted to a microscope objective. Myhrvold developed an optical path to fill a medium-format digital back, allowing him to obtain a  larger, sharper image than most microscopic photographs. 

To deal with the problem of melting, the microscope had a cooling stage that kept the snowflakes from vaporizing too quickly, giving Myhrvold more time to capture and focus-stack images.   

The camera was paired with short-pulse, high-speed LED lights, typically used for industrial purposes, to reduce the heat they put out and increase the speed he was able to capture images. With this innovation, the camera has a minimum shutter speed of 500 microseconds.

You can see more of Myhrvold’s work at his Modernist Cuisine gallery.

(via DP Review)


Image credits: Nathan Myhrvold of Modernist Cuisine Gallery and shared with permission.


from PetaPixel https://ift.tt/3luWpbS
via IFTTT

Dpreview.com: This DIY camera uses machine learning to tell you what it sees


via Articles: Digital Photography Review (dpreview.com) https://ift.tt/2IyD0Zj

PictureCorrect: Insect Photography Tips

Why photograph insects?

insect photo tips

“Insect” captured by Paulo Brandao

Because:

  • 75% of living creatures on the planet fall into the insect category
  • They’re fascinating subjects with great natural beauty
  • The “ugh” factor the insects inspire in most people prevents us from having a close up look at the real thing.

Photographing insects is a specialized field and volumes have been written on the subject. However, there are four basics you need to know when you start and once you “whys” and “how to” of these, you’ll be ready to go deeper into special effects and also start experimenting on your own. Your camera manual and articles on macro photography will tell you all you need to know about macro lenses and close up filters, so we won’t go into all that here.

1. Sharpness

Sharpness is one of the most important facets of insect photography. We’ve all seen images of flies and other insects where the minute hairs on the body are visible. Without this effect, the whole impact of the image is lost. The easiest way to ensure sharp focus is to use the auto focus option on your camera. When doing macro photography, even the slightest bit of hand shake can change the depth of field and affect the sharpness of the image, so any shake after the auto focus is complete will affect the picture. Use the normal technique of half pressing the shutter button to start the auto focus and take the picture as soon as possible. To minimize handshake, use a minimum shutter speed of 1/125 of a second.

2. Lighting

Lighting is a common problem in insect photography. Of course you can use a flash, but the problem with using a flash with macro against brightly colored plant backgrounds, which happens in most insect photography, is that the natural colors are sometimes lost. With a 1/125 of a second shutter speed, an insect that is not well lit may cause the auto focus to fail. In that case, try manual focus, and if that still doesn’t look good, go in for the flash option.

insect on brown background

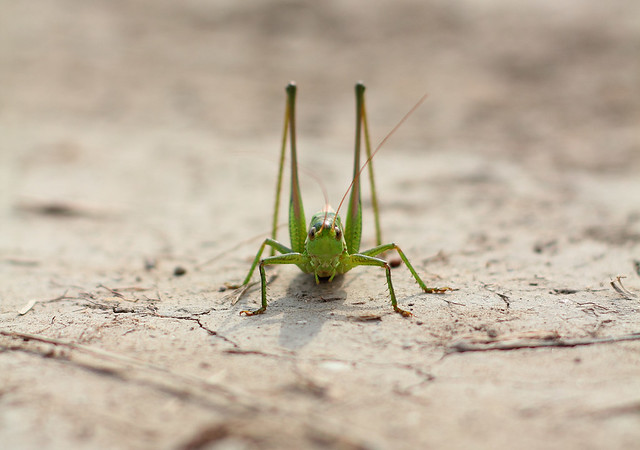
“Locust” captured by Rego Korosi

3. Background

Once you have your subject in proper focus, the next thing to do is look at the background. A blurred background will keep the attention on the insect. The easiest way to do this is to use the maximum possible zoom. A plus 10 macro lens at 84 mm focal length and a plus 4 lens at 210 mm will result in the same magnification but the latter option will produce a smooth, blurred background effect. Another thing to remember is that the greater the distance between the subject and the background, the more blurred the background becomes.

4. Framing

The final issue is framing. For the best effect, try to capture the insect from the front but at a slight angle. This will allow the head to be seen in relation to the body and keep the image in balance. With few exceptions, photos of an insect’s back are not of any great value. Keeping the insect slightly off center in the photo will yield positive results. Try using the “rule of thirds” for this.

dragonfly on flowers

“Om nom nom nom” captured by Erica Annie

Once you’re producing good results with these three techniques, you can start looking at experimenting on your own.

About the Author:
Peter Timko writes for Proud Photography, an online photography school.


Go to full article: Insect Photography Tips

What are your thoughts on this article? Join the discussion on Facebook

PictureCorrect subscribers can also learn more today with our #1 bestseller: The Photography Tutorial eBook

The post Insect Photography Tips appeared first on PictureCorrect.


from PictureCorrect https://ift.tt/2GY6rmI
via IFTTT

PetaPixel: Five Products That New Photographers Should Never Buy

Portrait photographer Miquel Quiles says he has seen new photographers make a lot of mistakes as they get started with their new hobby, one of which is where they choose to spend their money. In this 10-minute video, Quiles highlights five items he says new photographers should never buy.

Number one: Don’t buy a UV Filter. “UV filters don’t work any better towards protecting your lens than something like your lens hood that comes packaged in the box,” Quiles says. “It makes no sense to me why anyone would want to put a cheap piece of plastic or glass in front of their expensive lenses. They simply don’t do what the salespeople are telling you they do.”

Most cameras don’t have particularly good margins for resellers. Dealers make most of their money on volume when it comes to cameras and lenses. However, there is a lot more to be made in the accessories market. One reason a salesperson might try very hard to push a filter on you is that the margins of those filters are much better for them. The specific salesperson might not know this, but the Dealer they work for does and in training will likely instill the need to push products like UV filters onto their salespeople.

The next item Quiles says not to purchase might be a bit more contentious: AI retouching programs.

“I’m not going to name names, but you’ve probably seen ads that promise to retouch your portraits, make them look ‘flawless’ by pushing a button,” he says. “Here’s the truth: the results you get from programs like that are not acceptable at a commercial level.”

Quiles makes it clear that he believes these programs are a detriment to new photographers.

“There is no artificial intelligence that exists today that can make artistic decisions the way that a skilled photographer would.”

The third item builds on the last, as Quiles says that in addition to avoiding AI retouching programs, you should also avoid presets. Quiles says that many YouTubers will sell presets with the promise that with the push of a button, you can make your photos look like theirs.

“This simply isn’t true,” Quiles says emphatically. “Unless you shot the same type of photo they did under the same lighting conditions with similar gear, similar settings, your photos aren’t going to look like the examples that are being shown to you.”

Quiles says that while presets may help give you a good starting point, new photographers generally lack the knowledge and understanding to see this and will find themselves frustrated or confused instead.

“Hold off on buying presets until you’ve gotten comfortable using Lightroom, and by that point, you may decide that you’re better off without them.”

Don’t buy cheap memory cards. Quiles says that while you’re definitely going to need a memory card to take photos, obviously, but the allure of saving a lot of money on a cheap memory card is a bad trap to fall into.

“It didn’t make much sense to me why there was so much of [a price difference] and to be honest I didn’t care to learn, since I was saving so much money,” he says. “Here’s the thing though: not all memory cards are the same.”

Quiles says that it’s important to familiarize yourself with the numbers and symbols on memory cards and purchase the best card for the kind of work you are aiming to produce. If you do not, you may find that the card you purchase isn’t up to the task. This is especially the case if you plan to shoot any video.

The last thing Quiles says to avoid are camera bundles. “If you buy your camera from websites like Amazon, you’re guaranteed to see sellers offering these bundles that have tons of different things included for a few hundred dollars of the camera alone.”

But if you take the time to research all of the items being offered in those bundles, you’ll find that the value might not be as impressive as it first appears. A lot of the items may also end up being “cheap knockoffs” that Quiles says will very likely “end up in the garbage.”

His recommendation is to specifically just purchase the gear you actually want rather than roll the dice on bundles where you might be wasting your money on things you don’t want or need.

What do you think of these recommendations from Quiles? Have you made any of these mistakes before and regretted it? Let us know in the comments. For more from Miguel, you can follow him on Instagram or subscribe to his YouTube Channel.


from PetaPixel https://ift.tt/3lubH0v
via IFTTT